24 May 2016

Things to do while convalescing Part 2

The danger of surfing Trade Me and other auction sites is that you might be temped to buy stuff.  Like this busted up old oak table - $20 - bargain!


It appears to be English, maybe 80-100 years old, so not really an 'antique' as such, but with a lot of potential.  It's currently more of a kitset than a table though.


The top is a collection of warped and mouldy planks - it appears that all of the animal hide glue joints have failed, possibly as a result of a trip in a very hot shipping container from Africa.  Hide glue does not like extreme heat and is the main reason why antiques can be repaired again and again (unlike modern furniture).


Some pieces have come off the turned legs, but fortunately they all seem to have been carefully collected and stored by the previous owner.


 The table once had a winding mechanism for extending it but that has disappeared.  Apart from that though, it looks like an excellent project for the future, when I eventually regain the use of my left hand.


23 May 2016

Things to do while convalescing Part 1

I now have a fancy new semi-rigid cast on my writing hand:


In between answering work emails and watching the local wildlife go past...


... I've been teaching myself to write with my other hand.


The results are a bit patchy, but both speed and technique are improving slowly.

13 May 2016

Really?

Adding insult to injury (literally), as I sat bandaged up on the sofa recovering from surgery, the cat got a fright from an imaginary threat and decided the best place to be was on top of my head.


 Not impressed at all.  She is currently felina non grata.


A box of silky and beech

Before going under the knife I made a small box for my lovely wife using some leftover Australian silky oak and New Zealand red beech.


 Hand cutting the dovetails and sanding the finished box put paid to any ideas of further woodworking projects until I can sort out the whole pain-in-the-ass hand issue.  An ass hand you say?  Why, that's a cross between a sawhorse and a hand plane of course.  Good for not much.

A short break in transmission

The lack of posts this year has only been partly due to an old (1986) injury, which has progressively got more and more painful until I decided I had to get something done with it, and voila!  Eight screws in the wrist:


The other reason has been a lack of time or inclination when there are other more pressing things to attend to.  But now I will be somewhat limited as far as work or recreation I have no excuses...

18 November 2015

A thin veneer of success

Another Trade Me purchase a while ago was a small (600mm diameter) side table, advertised as 'solid mahogany', but with a damaged leather top.


When I picked it up it was immediately apparent that, although the legs looked mahogany-ish, the top was most definitely plywood.  A quick look at the underside revealed its provenance - made in England in the 1970's.  Oh well, after some negotiation I purchased it anyway for $30, with the aim to do 'something' with it.  Real leather for a replacement top seemed to be difficult to find in the sort of thickness I was after, so the table sat on top of a cupboard in the workshop for several months.

Then, on a visit to a specialty plywood merchant recently I noticed some leftover loose veneers of Sapele Pomelle or figured African Mahogany (Entandrophragma cylindricum) for sale for $3 each.  I bought three sheets, each one not quite big enough to cover the table top. 


These are modern machine peeled veneers, only 0.5mm thick and they were already starting to split, but maybe I could come up with an appealing pattern.


By the time I discarded the damaged and split pieces there was just enough for eight triangular sections.  Having never done any veneering before and not having access to a vacuum press or hide glue I though it would be a good learning exercise at the least.  I made up a board using 20mm MDF wrapped in kitchen paper to stop the glue adhering to it.


Then I glued the veneers using standard wood glue and placed the board on top, weighted it with a very flat paving stone and then clamped everything in place.


Unfortunately, as I suspected, the veneer wrinkled quite a bit due to the water content in the PVA glue.

To add to the problem, I managed to sand right through the wafer thin veneer in a couple of places in attempt to flatten out the wrinkles.


Next, the copper plated aluminium claw feet were pretty scruffy - bare patches of aluminium were showing through.  Based on my previous success re-plating the steel wardrobe handles I thought this would be an easy fix.

What I didn't count on was just how reactive aluminium is in a hydrochloric acid solution.  Adding insult to injury, two of the feet dropped off the wire hangers into the etching bath and by the time I fished them out the feet looked like this.


Never mind.  The table is still perfectly serviceable, even with its wrinkly top and missing feet.  Here it is with about six thin coats of shellac applied.


Not a complete success, but a great learning opportunity.


10 November 2015

Bargain Wardrobe

As mentioned previously here, another oak wardrobe was purchased off Trade Me for $29 back in mid 2014.


It was a bargain, but not without issues.  The main one being either past or current borer activity.  There was no way to tell whether the little critters were still alive so it had a liberal application of permethrin and then spent the next year undercover (along with another piece with similar Swiss cheesiness).


With no sign of fresh activity, I began addressing some of the other issues.


Some new American oak trim was installed to match the existing (left hand side door jamb and bottom moulding in photo above).


A new plywood drawer bottom was cut to replace the ugly and broken modern pine one.


And while I was at it the drawer completely fell apart so it was re-glued.
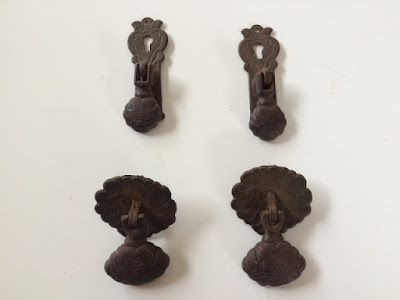
Before

The copper plated steel hardware had completely lost its copper plate, so I thought I would have a go at re-plating it with a hydrochloric acid solution, some old copper wire and a 6V battery.


The 6V battery proved to be too vigorous and the copper did not deposit well, so I had another go with an AA battery (1.5V) and this worked just fine.


The result, while not completely uniform, was a great improvement.

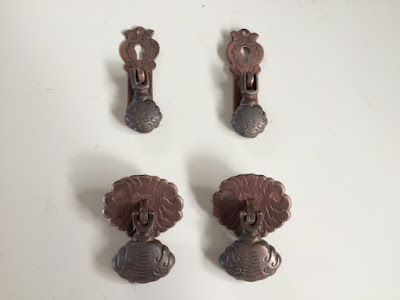
After copper plating.
Next, the loose mirror was re-secured using small triangular section blocks as per the original.  I used a piece of polycarbonate to protect the mirror surface while tapping pins in.


A new plywood back for the mirror was fixed in place and stained to match the carcase.  Then all that was left to do was apply a few coats of shellac (orange shellac flakes mixed with methylated spirits and applied using a brush or 'rubber' (cotton wad wrapped in cloth).


The new wood came up ok, but I still haven't got the stain colour right (new jamb strip on the left, original one on the right, below).


Then there was the small logistical issue of how to get the wardrobe across the gravel driveway.  The cabriole legs prevented me from using the hand truck, but my shop dollies and a few offcuts of plywood smoothed the path so to speak.


The bargain $29 wardrobe now resides happily in our bedroom - allowing for labour, materials, electricity etc it only cost $6029! 


23 October 2015

More Adirondacs

My good friend Rob was keen to build a couple of deck chairs, so we have spent a very enjoyable half dozen weekday evenings building another four examples of Norm's classic (blogged previously here).


And here are the finished products.  Two in pressure treated pine by Rob (to be painted) and two in Vitex (Vitex cofassus) as a wedding gift for my sister.


More Offcuts

Some leftover short offcuts of 190x45 American oak from the wood trim on the house (window sills) presented another good opportunity for maximum timber utilisation.  

This simple knife block was a good afternoon project.  Slots were cut on the table saw and then the three pieces (about 210mm long each) were glued together.


The hardest part was drilling the round hole for the knife steel.  Using various bits and extensions in the drill press, I eventually managed to drill all the way to the bottom, but not without the hole wandering approx 5mm from its vertical alignment - not terrible I guess, but I would like to come up with a better technique for future attempts.

The photo below also shows another problem - the pieces of 190x45 were slightly cupped.  They were too wide for my 6" jointer, and my cheap lunchbox thicknesser takes a nasty snipe out of the first 50mm, which would be unacceptable for such short pieces.


Rather than try to hand flatten them, I concluded that all that was necessary was some modern cross linked poly vinyl acetate adhesive and a good bit of clamp pressure, and voila!


 Oh well, I've learnt my lesson then.

12 August 2015

Off-cuts

Cutting the hole for the sink in our new laminated macrocarpa bench top resulted in a nice piece of wood, surplus to requirements.  What better use for the off-cut than another cutting board (or three) - this time butcher's blocks.


After gluing up strips of the laminated wood they were flattened with a combination of a hand held belt sander and a block plane.

The block plane was originally developed to flatten butcher's blocks but is one of the most useful tools in the workshop.  Here is my one (image from the Veritas Tools website).